Showing posts with label diy. Show all posts

06 May 2016

DIY Stamped Doormat


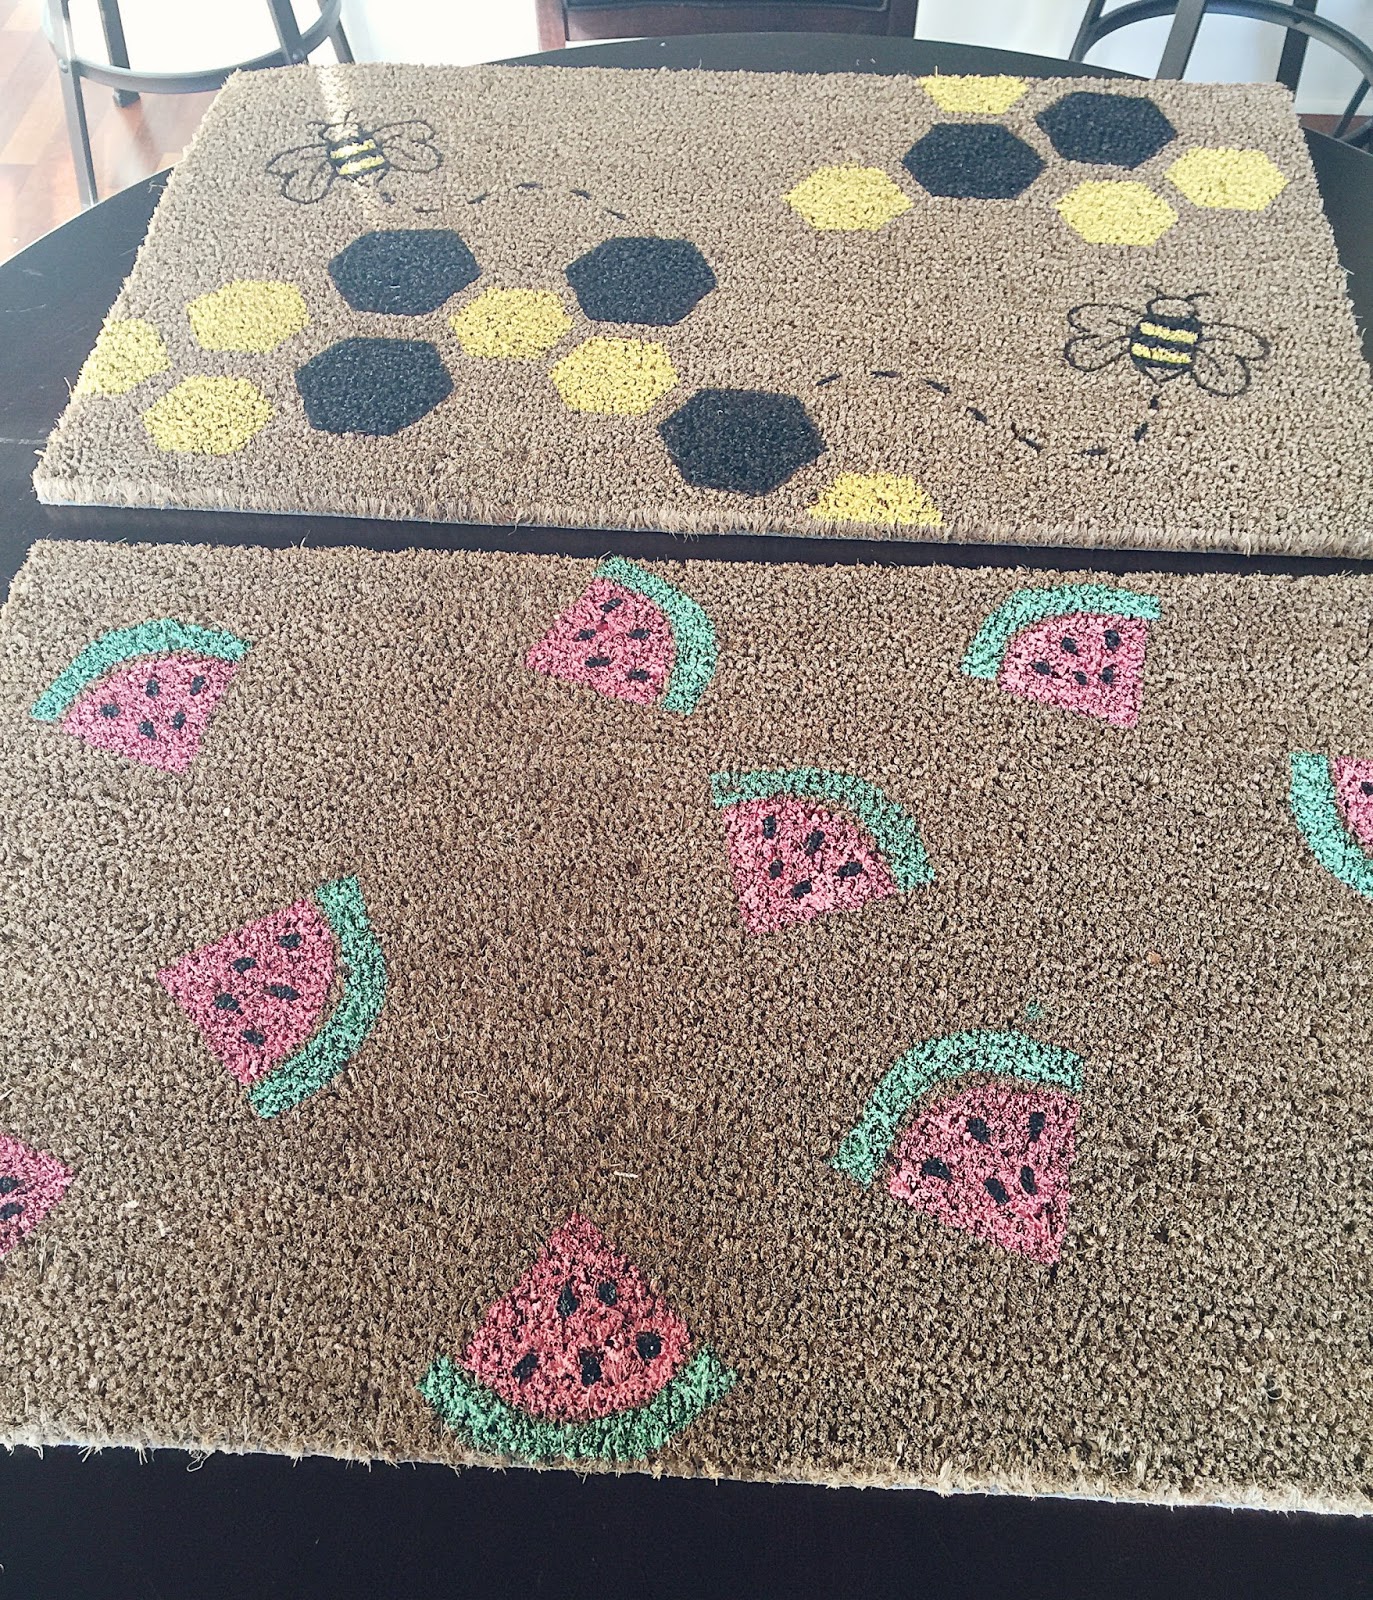
I saw the cutest doormat EVER on Pinterest the other day and I just had to try to recreate it. Well, not only did I recreate the adorable watermelon motif but I also made my own version with bees that is the perfect Mother's Day gift for my Mother-in-law who just happens to raise honey bees

The first (and hardest) part of this process was finding blank welcome mats. I thought this would be easy but the only place I could find them was at Home Depot. Everywhere else I looked had welcome mats that all had patterns, colors, or sayings. I also picked up a large sponge in the tile laying section (believe it or not, they only had little ones in the cleaning section.. go figure!) and paint. I got sample sizes of black and yellow for the bee mat and a pretty coral and green for the watermelons. 


For the watermelon mat, I followed the directions from the original source and cut my sponge up into stamps. After drawing the shape out with a sharpie (as you can see in the pictures) and doing a little bit of experimental cutting, I eventually got a watermelon slice in a good size. I then just went to town stamping the mat. When I was finished, I went back over the watermelon with a small paint brush to really get a good layer of paint on there and make the color brighter and more defined. When the pink was dry I drew the seeds on with a little black paint and a small paint brush. 


It turned out so cute!! I was feeling pretty confident after making the watermelon mat that I figured I could pull off a honey bee mat as well. 


I didn't have too much sponge left after the watermelons but I was able to get two different sized hexagons out of my remaining pieces. I also doodled a bee outline on a piece of paper that I stuck to the mat with some pins and then traced with a black paint pen. When I was done tracing the bee I went over it with the black paint and a thin paint brush. Then, just like the watermelon pieces, I simply stamped the hexagons onto the mat and then went over them with a paint brush to define the shape and brighten the color. 


That's it!! It didn't take very long and I gotta say, I think they both turned out super cute. I intended these both to be gifts but it will definitely be hard to let these go. I might just have to make one (or more) for myself. Maybe one with cactus?? Or donuts??? The possibilities are endless!! 


08 December 2015

The Best Stocking Stuffer -- for College Students

This shop has been compensated by Collective Bias, Inc. and its advertiser. All opinions are mine alone. #SlimJimYourHoliday #CollectiveBias


I am the type of person who likes to give thoughtful, useful gifts at Christmas time. I want people to know I appreciate them about and that I put thought into something they would enjoy and/or need. For some reason, I have the hardest time choosing a gift to give to my brother, who is in college. I don't know why! At first thought, buying for a college student would be simple, but I always have the most difficult time with this one.

This year, I think I found a good gift to give him (I don't want to share yet, juuuuust in case he reads this here blog), but I also came up with a GREAT stocking stuffer that I'm pretty excited about. A Study Survival Kit!!!


I filled a mason jar with chocolate candy, peanuts, and Slim Jims. It's the perfect combination of salty and sweet and super easy to throw into a backpack to be brought to the library for long study sessions.

Not going to lie, my husband asked for one of these jars in his stocking this year. It also makes a great work snack for those of us who are no longer students.

Bonus, the 26 pack of Slim Jims makes it SUPER easy to make multiple jars.


I found everything I needed at Walmart!


What are your favorite stocking stuffers to give or receive??

01 December 2015

The Easiest Way to Gift Christmas Cookies

This shop has been compensated by Collective Bias, Inc. and its advertiser. All opinions are mine alone. #ShareTheHoliday #CollectiveBias


One of my favorite parts of the Christmas season is the giving. I love finding the perfect gift for someone I care about. I especially love making gifts for people and including everyone! This year, I'll be using these Rubbermaid TakeAlongs that I found at Walmart to give homemade Christmas cookies to the important people I encounter everyday that I want to thank in a special way. I want them to know they're important to me! For instance, my coworkers (who I spend more time with than just about anybody), my trolley driver (I have the same one every afternoon), and my mailman.


I could just plop some cookies on a paper plate and call it a day, but isn't a seal-able container so much better? It'll keep the cookies fresh anddddd they're way cuter. Plus, you won't have to worry about anything spilling or getting crumbs everywhere.

The add some extra Christmas cheer to the containers, I simply wrapped them around a few times with yarn, and added some tassels I threw together. Then, I attached a printable to make this gift even more festive. I will write a special little note on the back of the tag before I give them to the lucky recipient.

Oh, and how about I make this even easier for you to give the gift of Christmas cookies?? Here's a link to the Santa Approved printable!

https://drive.google.com/file/d/0B2V9hHZzKOzvV2FPZ1E5bWtpV0E/view


Now I'm not just going to leave you hanging. Here's the recipe I used to make these deliciousssss Snickerdoodle Butter Cookies. I have many fond memories from my childhood of decorating butter cookies around Christmas time. It's still just as fun to do as an adult. Seriously, try it!


You know, these Rubermaid TakeAlongs would also be great to send guests home with leftovers after a holiday gathering. The possibilities are endless. 

Also, for the Ibotta users out there, there's a special $1 Off Any 2 Rubbermaid TakeAlong Products rebate right now exclusive to Walmart shoppers.


Ok, now I want to know, what kinds of Christmas cookies are you making this year???

06 November 2015

Anthropologie Hack: DIY Jingling Monogram Ornament


Anthropologie just might be one of my favorite stores. The problem? I'm not a millionaire. Whenever I find myself browsing through their website, I always find things I love only to realize they are way out of my price range. When I saw these adorable ornaments, I instantly pictured myself attaching them to wrapped presents this Christmas. They're $8, that's totally affordable!! Until you start buying one for everyone you know. So, I figured I would just try to make my own.

This project is prettttty self explanatory but here's what I did...


Supplies:
Chipboard Letters
Yarn
Jingle Bells
Glue Gun
Needle and Thread


Step 1 - Wrap the chipboard letters with yarn. I started with the red, and wrapped about half of the letter leaving some space for the white. For the tough corners, I used my glue gun for help. Then,  I finished wrapping the letter with the white yarn until it looked complete.

Step 2 - To attach the jingle bells, I got out a needle and red thread and sewed them onto the letter.

Step 3 - To attach the hanging hook, I used the needle and thread again so that it would stay put.


andddd that's it! Not too difficult, and these little letters will look super cute and add a little jingle to my Christmas wrapping this year.
 

24 November 2014

Anthropologie Hack: DIY Woodblock Calendar


I was browsing the Anthropologie website last week lusting after all the amazing products they have that are wayyyyyy out of my price range. I kept thing, "pshhh, why is this so expensive? I could totally make this." So, I picked a cute item and put my do-it-yourself skills to the test!

I decided to try my hand at making this cute woodblock calendar. I liked the modern geometric pattern, but I wasn't the biggest fan of the colors, so I made it my own.


Here's what you need:
Paint: I chose three colors of Martha Stewart paints in coordinating colors. I used Pea Shoot, Arrowhead, and Beetle Black.
Wood Blocks: They can be found in the wood section of any craft store. I found mine at Michael's. They had a variety of sizes, I chose the 1 inch. I ended up using 17 blocks. I'm sure some of you smarter people can figure out how to make this craft with less. For instance, the Anthropologie website says their calendar consists of 12 blocks.
Brushes
Painter's Tape
** Alphabet Stencils: I had intended to make the lettering with stencils, however, I couldn't find any in a font that I liked so I just free-handed the letters and used sharpies.

Steps:
First, I sketched out the letters and numbers on the blocks. Starting with January, I went through the months to make sure I had every letter accounted for. Don't be afraid to reuse letters and blocks! For instance, the UARY in January is the same UARY in February, I just put the F on the same block as the J. Does that make sense? You can absolutely get creative with this. I didn't want to have any blocks that were entirely letters, I wanted at least one side with a design, so that's what I did!


After all the letters and numbers were complete, I started painting. I added some painters tape to blocks that would have the triangle pattern. I also just painted some sides of the blocks solid colors.

The paint dried pretty quickly, so I was able to complete this project in no time at all.


I especially love how versatile this project is. You don't have to make a calendar! You can pretty much have the blocks say whatever you want... or nothing at all and just keep them geometric.  I'm thinking maybe a "Merry Christmas" set would be cute, or maybe a "Go Tigers Go".


20 November 2014

DIY Rustic Industrial Shelves


Pretty much since the day we first bought our first home, I had been talking about hanging shelves above the desk. Well, it took us over a year but we finally have shelves! Not just any shelves though... they're shelves we made.

We have lots of exposed brick and beams throughout our home that we've incorporated into our decorating. We didn't want the shelves to look too "new", we wanted them to fit into the industrial feel, and we especially wanted them to fit into our budget soooo we made our own!

Since we live in a condo and don't have a yard or a workshop or anything like that, we needed this process to be relatively simple.


Brackets: While browsing Home Depot one day we stumbled across these brackets in the closet section that were a good color and looked industrial. What we especially liked about them was that they would be safe. We knew we could hang these on the wall and put a significant amount of weight on them and they wouldn't budge.

Wood: For the actual shelf part, we ventured into the wood section of Home Depot and consulted an employee on the best type of wood for us to use. We explained what we were doing and he suggested a durable and affordable type of wood. He also suggested wood that would hold stain.

We found a stain that was similar to the color of the exposed beams in our home.

Since we didn't want the shelves to look too "new", we distressed the wood before staining by hitting it with chains and nicking it up with a hammer.


That's pretty much it!! We stained the wood first, attached the brackets, then hung them on the wall. I'm loving the way they turned out. I had fun decorating them for Halloween and I'm getting pretty excited about how they'll look for Christmas.


14 August 2014

DIY Teacup Bird Feeder


When giving gifts, I always try to give something thoughtful and special. Because of this, I sometimes have a hard time coming up with gift ideas!! When I saw this little craft on Pinterest, I knew it would make a great gift andddd it would be something I absolutely could pull off. With a little help from my husband, we turned gorgeous teacups into cute garden accessories that the birds adore.


All you need for this is a teacup, a copper pipe, a pipe adapter, and some epoxy.

Jeremy and I went to the local antique mall and found two teacups we thought would look beautiful in a garden.

Probably the funniest part of this whole process was going to Home Depot and asking them for good strong outdoor glue. They showed us all the cement and concrete glue. When we told them we were just trying to glue a teacup together I think they thought we were joking. We eventually found the perfect epoxy for what we needed.


Step 1: Gather supplies
Step 2: Mix glue based on manufactuerers instructions
Step 3: Glue pipe adapter onto bottom of saucer
Step 4: Spread glue onto bottom of teacup and glue to saucer
Step 5: Let the glue dry completely before attaching the copper pipe


This project is so so simple but the results are pretty great. When we gave one of these teacups to my Mom for her birthday, she couldn't believe we had made it!


Have you crafted anything lately? I'm always looking for fun new ideas :)


Linking up: here / here / here / here / here / here / here